Tuesday, June 19, 2012

It Happened When...

Chris took a small point and shoot camera with him on his mission trip to Mexico, but he didn't manage to get in front of the camera very often. I do however have tons of pictures, videos even, of the poor pig that became dinner one evening. I am not kidding. There were probably 50-60+ pictures AND video clips of that disturbing episode. It must have been the highlight of his trip. The guys drew straws for the honor of wielding the knife. Then they proceeded to take photos of the entire process, from gutting to roasting on the spit. Boys!

I was particularly happy to find these great photos of my son on the same memory card. Thankfully he had one of his friends snap pics of him leaning against one of the Aztec pyramids on the day their toured the area. Finally, a pleasant subject for me to scrap. In spite of his slightly apathetic attitude towards picture-taking and scrapbooking, I believe that there will come a time when Chris will be glad that I've preserved these memories for him. If not, well I at least had fun creating this page. ;)


Papers and stickers are a mix of Crate Paper, Studio Calico, Echo Park, and October Afternoon. Large letter stickers are October Afternoon (blue) and BasicGrey (red). Small letter stickers are Making Memories.


Monday, June 18, 2012

Dine Around The World-Dessert Style

When Kevin was a baby, we took a trip to Walt Disney World one summer, and all seven of us squeezed into a cabin at the Fort Wilderness Resort. It was a really cool place actually. The kids got a kick out of the Murphy bed in the living room. It was pulled down from the wall every night, with Tommy and I as bookends and Kevin in the middle. The other four kids settled into the bedroom, girls sharing the double bed and boys climbing into the bunks. It worked. We loved the peace and quiet of the area with no banging doors or noisy hallways to keep us awake. Well, it WAS quiet until the free-roaming peacocks started up their cawing. Thankfully the beautiful creatures slept at night.

But the greatest amenity and the real reason we chose to stay in the cabins that year was the kitchen. With the full-sized refrigerator, microwave, stove, dishwasher, coffeemaker, and cabinets full of equipment, we didn't have to rely on expensive Disney dining. And we didn't have to worry about finding food that the baby would eat. We also didn't get to do things like Dine Around the World. At least not that year.


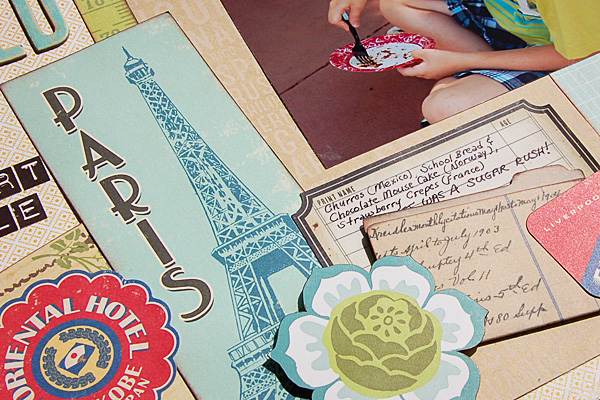
When I first heard of this idea, to dine in bits and pieces from one end of Epcot's World Showcase to the other, it sounded like an awesome plan. It was something I wanted to do when we vacationed at Walt Disney World last spring. We could get this and that, sharing and tasting all sorts of ethnic fare. Unfortunately, the rest of my crew wasn't impressed with the idea, so that evening in Epcot after eating regular dinner fare, I persuaded them to try the mini Dine-Around, desserts only. It wasn't hard to convince 11 year old Kevin! He eyed up the Chocolate Mouse Cake a couple of days earlier and couldn't wait to try it. I wasn't quick enough with my camera though and the only pictures I had to scrap were of him scraping the crumbs from his plate. Dine Around-Desserts...what a cool idea!


Churros in Mexico, School Bread in Norway, and Strawberry Crepes in France rounded out our dine-around. Next time, we go all out. :)


Sunday, June 17, 2012

Hey Mister


Do you know that purple, green, and gold are the traditional colors of Mardi Gras? Purple represents justice. Green represents faith. And gold represents power. I know from experience that the colors of Mardi Gras are not the easiest to find in patterned papers, so when I discovered 2/3rds of them in the Oh Snap! kit from Scraptastic, an idea was born. By adding a few purple flowers to the yellow and green papers, stickers, and rub-ons in the kit, I was able to scrap these fun photos of my youngest before the parades on "Fat Tuesday".


As usual, I cut up my patterned papers so that the remaining portions could be allotted to other pages. That green border is just that...a border cut slightly larger than the yellow and both are adhered to a plain piece of cardstock. That way I don't waste an entire sheet of patterned paper and I am free to use the middle on another layout.


I had the idea to bring a little more purple to my page by cutting the title from cardstock covered with washi tape. The washi tape from my stash was a great shade of Mardi Gras purple. I laid out 5 or 6 rows of tape and ran it through my die-cutting machine.The idea worked and the paper/tape combo cut like butter. This is a technique I'm sure to use on future projects. 


Before I go, here's an interesting story about how Mardi Gras influenced the color choices of rival universities, LSU and Tulane. Supposedly, stores in the New Orleans area had stocked up on purple, green, and gold fabric in anticipation of the Mardi Gras season. Around this same time, LSU was deciding on its colors. They chose purple and gold and bought up much of the stock of these colored fabrics. Tulane then bought much of the fabric in the remaining color-green. (Tulane's colors are blue and green.) Sounds like a tall tale to me, but I'll go with it anyway.

Stay tuned, because I have one more page completed with the Oh Snap! kit...and it is the most colorful yet!

Friday, June 15, 2012

The Waiting Game

We arrived at Hollywood Studios too early for our dining reservations on this our first day of our WDW vacation last year. But we didn't have enough time to do anything else, so we picked up Fastpasses for Rock 'N Roller Coaster and headed over to the Streets of America to chill. In the photo on this page, Kevin has his nose in the Disney Guidebook for kids. He read that thing cover to cover before the weeks preceding our trip and took it with him everywhere while we were there, determined not to miss a thing. While he read up on the attractions at Hollywood Studios, the rest of us began...The Waiting Game.


Of course I had to do a banner on this, the 4th page created with my build-it-yourself kit. It's the perfect solution when you have a bunch of bits and pieces.


It's a fun challenge to combine and arrange all the interesting tidbits that populate the banner...tickets stubs, cards, tags, flowers, buttons, charms, etc. I don't think I'll ever tire of creating these fun and trendy embellishments.

Thursday, June 14, 2012

And We Danced

This page combines the kit challenge with an idea I found on the UK Scrapper's site. Shimelle Laine of Glitter Girl fame has a monthly step-by-step tutorial and I was quite inspired by her May creation where she scrapped a strip of photobooth pics. The design was incredibly beautiful and every scrapper who completed a project inspired by the tutorial came up with a masterpiece. As luck would have it, we attended a wedding just a week or so later where a photobooth was provided for the guests' entertainment, supplying me with the necessary strip of pics! Shimelle's formula inspired the resulting page, And We Danced:


The recipe: a little BasicGrey What's Up, Nook And Pantry, and Plumeria, a couple of Crate Paper stickers, a Jenni Bowlin bingo card and Scenic route scrap from DEEP in the stash, a doily, small letter stickers from Making Memories and large letters from Crate Paper.


This design is so pretty and versatile. I challenge you to give it a try yourself!


Wednesday, June 13, 2012

Another Kit Challenge LO

Here's the second of four pages created with my homemade "kit", built around the papers of BasicGrey's What's Up collection:


I always have a hard time with school portraits, and they don't often make it to a scrapbook page, but this was Brendan's first professional photo after the braces came off and his smile was such a knock-out that I couldn't resist the attempt. The Journey chipboard is an old "leftover" that was colored way back in the day, and yet it coordinated perfectly. I added words, a ticket, stickers and a fleur-de-lis rub-on and voila!


Isn't it great when long lost scrappy items are re-discovered and make their way onto a page?! I still remember how much I loved this set of embossed chipboard. Another piece in the collection was misted, inked, cut apart and used to embellish this page created for Lifetime Moments back in 2009:


Tomorrow, I'll be back with a third page from the same build-your-own-kit. Wow...I feel so productive!

Tuesday, June 12, 2012

Late To The Party!

Better late than never, right? Just after National Scrapbooking Day, there was this Inspired By Shimelle challenge, designed to motivate scrappers to create a kit out of supplies they already have on hand. Sounds easy enough, but the real challenge is to actually USE this kit to create as many projects as possible from the same set of supplies. The idea is that this home-made "kit" would jump-start your creativity while saving time that would otherwise be spent rooting through your stash each time you began a project. Sounds like a plan to me, so I decided to give it a go (with a few modifications).

The original challenge was to create a kit with 10 patterned papers. Seriously?! I have used seven or more (pieces) on one layout! And 5 sheets of cardstock...blech...I rarely use any. So obviously I had to amend this challenge for my personal preferences and created a kit that was designed for how *I* like to scrap.

Since I had recently acquired several sheets of BasicGrey's What's Up collection, I decided to build my kit around those colors, adding a few more sheets of paper and several coordinating scraps. Then I shopped my stash for bingo cards, ticket stubs, tags, brads, and more, along with a few stickers, Thickers, and rub-ons. Lots of old to mix with the new! This is what my "kit" looked like at the start:


A week later, it's been decimated! And I have four newly created pages, favorites every one. This was the first layout I made:


It's weird, but until I photographed this layout and viewed it on the computer screen, I thought the chipboard letters that spelled "what" were black! Nope...they are brown. So strange, because in real life, they appear totally black. Hmph!


My photo of the old Hollywood Tower Hotel (The Tower of Terror ride at WDW) was perfectly suited for the What's Up collection. The photo of the occupants of our "elevator" was not so suited. I created a chipboard pull-out piece to hide it. It adds to the suspense when you have to physically slide out the picture of the terrified passengers. Tee-hee.


One of the balloons and a few buildings were fussy cut from one half of the patterned paper and popped up over the other side of the paper to give a more dimensional landscape and sky. Upon finishing the page, I realized that there are patterned papers from three different BasicGrey collections on here-What's Up, Plumeria, and Nook And Pantry. Love how they coordinate!

Tomorrow I'll share another page with my kit. :)