Showing posts with label banner. Show all posts

Friday, April 3, 2020

Heavy Metal-Reward

I've had this photo for a while and the Cocoa Vanilla Legendary collection helped me get it on a page.  Now that my son no longer swims, these ribbons and trophies, as well as a small fortune in dry rotting tech suits are the remnants of a sport that consumed him for a good 6-7 years. I wanted to document his collection of awards in a fun way, so I created a bustling banner decorated with die-cuts, stickers, flair, and brads from my stash.

Brads are still a favorite embellishment, so I was happily inspired to use a few for Paper Issues' Heavy Metal challenge. 


I actually scrap lifted myself with this one, and in turn scrap lifted Susan Stringfellow, who inspired my Spongebob Monopoly page below. It's still one of my favorites!


Thanks for stopping by today. Check out the Paper Issues store for brads, die-cuts, the fabulous Legendary papers and so many more new collections. Use my code to save 20%!


Monday, February 17, 2020

Yesterday's Scraplift Sunday-Today

Yesterday was another Scraplift Sunday over at Paper Issues, and I played along. I scrapped an early morning photo snapped at the airport, as we were preparing to fly home from a trip to San Antonio late last year.

First I used a stencil to trace and cut a background reminiscent of the sun rays in my picture, layering it over another patterned paper.

Then I laid a horizontal strip from which to hang my colorful banner pieces of all shapes, sizes and patterns...the real fun part of this page!


As you can see, I drew inspiration from both the photo and the banners 
on Chelsea's gorgeous original:


Journaling was kept simple. 
Short and sweet, it uses only half of a journaling card tucked in behind the photo.


I LOVE banners! They are such an easy and fun way to embellish a page:


This is one of my favorite collections. Simple Stories, Oh Happy Day has the cutest diecuts, gorgeous papers, chipboard, and washi tape AND it can still be found in the Paper Issues store!

For this and every other scrapbooking supply on your list, check out the store, an use my code to get 20% off of your entire order. 


Saturday, September 1, 2018

Use Those Journal Cards (A Step-By-Step for MCS)


(This tutorial was first published on the My Creative Scrapbooks blog.)

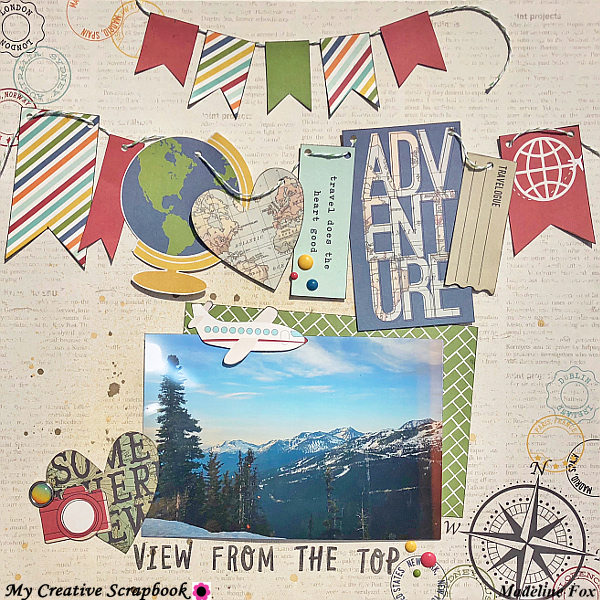
Today I'm sharing a fun travel page, assembled using the July main kit from My Creative Scrapbooks. And believe it or not, the page was created with only two sheets of patterned paper: one for the background and a second for everything else!


Now I'll tell you exactly how I did it!

First, I gave my background a little spritzing with 2 colors of mist-one light, one dark:


Then I strategically cut a rectangle slightly smaller than my photo, in the exact spot where I would place the picture.

I placed my photo exactly where I wanted it to end up and pencil marked its outline:


Then I cut inward approximately 1/4 inch from the pencil marks, removed and flipped the rectangle of paper:


Now I had a rectangle of green print, the reverse of my background page. I thought it would make a great photo mat, but, being slightly smaller than the photo itself, I needed to place it off-center or somewhat askew as shown below:


Next it's on to fussy cutting. The sheet of travel journal cards holds so much potential; they just needed to be set free! So, after cutting apart each of the rectangles, I fussy cut various elements from them: the globe, heart, airplane, and camera. Then I created banners from some of the other pieces. 


 As you can see, even the smallest of scraps came in handy for the upper banner:


When I cut apart the map-print heart and phrase below it, I was left with a stencil which I used to cut a second heart for my page:


With baker's twine, I assembled my banners, gluing the flags on the upper banner, but punching holes and threading the twine on the lower one. Other details were added, including the fussy cut airplane and enamel dots.


 That second cutout heart became part of a cluster that overlaps the photo:


And finally, a title was created with the kit's alphabet stamp set:


Here it is again, all from two sheets of paper and elements from My Creative Scrapbooks July main kit. 


Wednesday, December 21, 2016

Best Ever

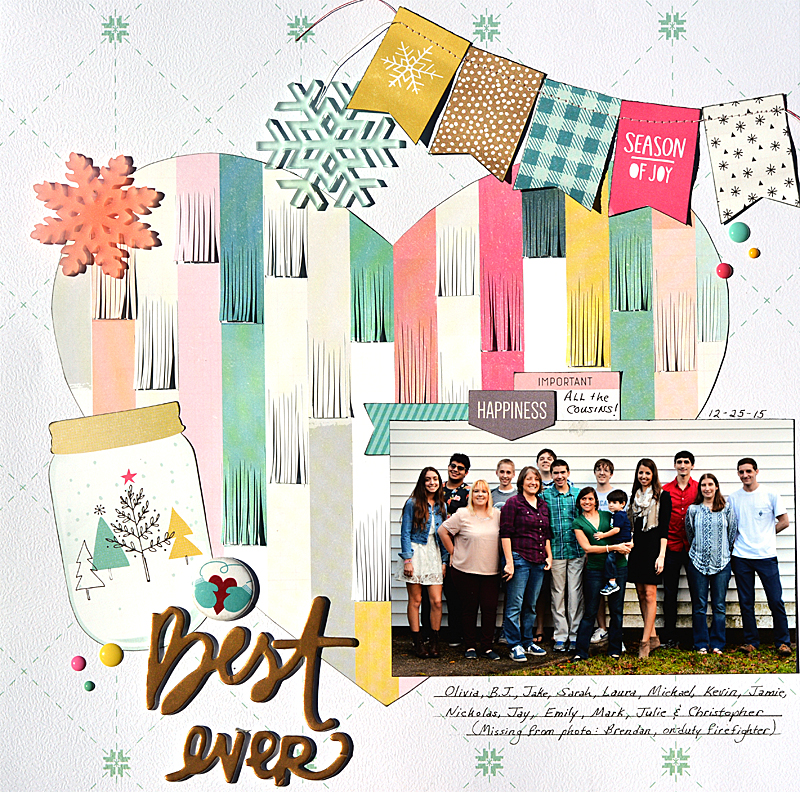
It may at first seem a little ridiculous to even think that I'd ever use a scrapbook paper collection called "Snow and Cocoa". Snow is such a rarity in the deep south. But these papers and patterns are just SO PRETTY! Here I scrapped a Christmas cousins photo from 2015. As you can see, everyone is in short sleeves. Hahaha!


I decided to cut one of the colorful papers into a large heart shape for my page. But I couldn't just let it be. The heart was begging to be fringed. It then made a beautiful backdrop for my photo, a sewn banner, a couple of acrylic snowflakes, "snow globe", flair, and title.

We never know what weather will greet us Christmas morn. Will this year be long sleeves, boots and sweaters...or short sleeves with the A/C blasting? We'll see!

Tuesday, December 20, 2016

Hello Destin

Since I had already cut into the patterned papers from Simple Stories' You Are Here collection for the scrapbook page shared on the blog yesterday, it was a snap to create a second, coordinating page. The scraps were fit and layered to completely cover my cardstock background, their size and shape dictating the basic look of the page.


I particularly like the "hello" letters from the You Are Here sticker sheet. Cool that they have the same pretty landscape print from the card above them. This IS our happy place!

Several bits and pieces from my stash, including some (very) old S.E.I. alphabet stickers, were used to accent the page. I rooted through my box of "summer" scrapbook stuff for similarly colored pieces. I spy a postcard from an older Simple Stories collection, flags from Fancy Pants, and a checkered brad from who-knows-where.


As you can see, the brad was missing from this first pass in front of the camera, proving that if a page sits long enough on my easel, I'll surely find something else to add! Nothing's safe. ;)


Monday, September 26, 2016

Sharks!

Does anyone recall the shark graphic on the old Jaws movie poster? Let me refresh your memory. It depicts a gigantic great white, rising up from the ocean, huge mouth open, baring a set of sharp, pointy teeth. Hmmm...kinda like the paper-pieced shark on the scrapbook page below!


So many of my swim-related scrapbook pages feature photos of my son, my current swimmer. This page, however, features two of his coaches, one of whom happens to be my daughter. These photos were taken at our team's summertime "away" meet. Go Sharks!


I pulled out some older papers and paper scraps for this page, and kept to a near-monochromatic color scheme of blue, white, and black.


Patterned papers in various designs were layered along the bottom of the page, with the shark rising above them. A dictionary-print paper was perfect for the main attraction! A simple banner of baker's twine and triangular flags was strung across the top of the page with my title. The same black and white baker's twine was tied onto the tag that was tucked behind the upper photo.

~~~~~~~~~~^~~~~~~~~~~

When Laura ended her long swimming career after a short stint swimming for LSU, I never expected to see her on this side of the blocks! It's great to see her enthusiasm as she shares her love of the sport with the kids that she coaches. In fact, she'll often come home from a swim meet hoarse, after a day of cheering for her team. :)

Friday, August 5, 2016

Biloxi Lighthouse

According to Wikipedia, the Biloxi lighthouse was erected in 1858 and has the distinction of being tended by female lightkeepers for more years than any other lighthouse in the U. S. One such keeper assumed the role after her husband died, tending the light for 53 years! Having survived scores of hurricanes, this lighthouse today is a Mississippi landmark and tourist attraction. 

I created the layout below  with a photo of the historic lighthouse and an awesome digitally cut lighthouse from The Cut Shoppe. Their Land Ho cut file set also includes an anchor as well as a few jolly good phrases.


Cut from a grey print paper, my lighthouse was inked for dimension: black ink for shadows, white for highlights. A washi tape banner picks up the yellow, red, and navy of my papers:


Layers of patterned paper, an anchor-print string envelope, postcard journal card, anchor pin, and coordinating enamel dots complete the page.


Who can resist anchors? Not me, that's for sure! ;)


Tuesday, August 2, 2016

Go Catch A Wave

I love the action photo I captured on the page below! The three cousins were going out to ride their boards on the first day of our beach vacation, jumping up over the swells as they head out in search of even bigger waves.


The beautifully vivid patterned papers are solely from the Carta Bella Beach Day collection.

Banners are still a favorite embellishment, and on the layout below I created an oversized one, cutting out flags, phrases, sunglasses and a swimsuit from Beach Day papers.


The large acrylic word, GO, is an exclusive from a Scraptastic kit. I completed the title with colorfully printed Thickers chipboard letters.


They caught many a wave that day, the day after, and the day after that. What fun it was!

Saturday, July 30, 2016

Scraplift Challenge

What better way to jumpstart some summer scrapbooking than with a scraplift!? Given this challenge for a Scraptastic blog post, I headed on over to the Scraptastic Members Facebook Group and perused all the awesome pages that were uploaded to the group. There were so many gorgeous layouts that I couldn't just choose one. I chose two, and came out with two wonderful pages of my own.

 The first piece of beautiful inspiration was created by Aimee Dow:


Here's my take, albeit with two photos and an extra strip of stripe on the left:


I love how this photo came out sort of silhouette-like, just before his event, the 1500 meter freestyle (a mile!). Of course I had to mimic the pool flags with a little banner of my own. ;)


I created a second page based on this fabulous layout by Paige Sterling Fox. Grid designs are a favorite!


As you can see, I switched around the placement of my photo and the little squares, but still kept true to the basic design. 

This was my son's first time swimming in the State Championship Meet, so stars, splatters, and appropriate phrases abound:


It was quite nice to have these wonderful Scraptastic Subscriber pages on hand to direct my own, as it sure shaves time! Thanks for the inspiration ladies!

Monday, November 9, 2015

The Big SIX-Oh!

I love using my digital cutter to enhance my scrapbooking. Today I'm sharing a page whose background was created using the All Heart cut file from The Cut Shoppe. The subtle, neutral background was certainly a great foundation on which to build this colorful, celebratory page. My husband and his twin were celebrating the birthday, and a big one at that! 


Supplies: Patterned paper, journal cards, chipboard stickers, buttons, flair and tag-Fancy Pants, mist-Mr. Huey's, cardstock-Bazzill, Alphabet-Jillibean Soup, enamel dots, and the following cut file :


As you can see from the completed page, I only cut the outer two rows of hearts. Before beginning the cut, I opened up the original All Heart cut file in my digital cutting program and eliminated the inner rows which were not going to be visible anyway. It saved time and wear and tear on my blade by paring down the necessary cuts.

The big SIX-Oh! I think we're going to start counting backwards now. ;)


Thursday, October 29, 2015

The Cut Shoppe Blog Hop-Tabasco Pumpkin


Welcome to the Paper Gumbo edition of The Cut Shoppe Halloween blog hop, where you will find all sorts of spooky, silly, and fun creations from the design team, and opportunities to win some of our favorite cut files. One lucky winner will receive a $25 GC to The Cut Shoppe store! All winners, chosen randomly, will be announced November 6th on The Cut Shoppe blog.

Leave a comment on this post by November 2nd to be entered into a drawing for the Fall Finds cut file.


I don't know about you, but I LOVE carving a pumpkin for my porch at Halloween. Some years I spend hours creating a masterpiece. Other times it's a pared down effort: 2 eyes, a nose and a mouth. The cool pumpkin below was one I spied at the Avery Island Tabasco gift shop last year.


The little "pumpkin patch" underneath my photo was created with the cut file seen above.

For a more casual look, reminiscent of a pumpkin patch, I cut apart a couple of the pumpkins and staggered them beneath the upper row. Individual pumpkins were backed with orange papers in various shades and patterns.


At the top of the page is a smallish banner cluster, mimicking the larger banners in the center of the page:


and a title above the photo:


How about the pumpkin in my picture? Impressive! That's some mad carving skills! I just might be inspired to attempt some fancy carving myself this year. Guess I'd better start looking for that perfect pumpkin. ;)

Remember to leave a comment on this post by November 2nd to be entered into a drawing for the Fall Finds cut file from The Cut Shoppe store. For more fabulous project and chances to win, visit each of the blogs below:

Tuesday, April 7, 2015

Look Out World!

I thought I had a bit longer, but when I overheard another mom with a son in my child's grade talking, I realized I didn't. She was talking about registering her son for Driver's Ed. It doesn't seem possible! Wasn't it just a little while ago that he was in this car at Epcot, barely peering over the window, feet dangling far above the floorboard of the car?! 

I chose Studio Tekturek's One Way Ticket collection to set off my photos. The paper airplanes and deep blue celestial print are favorite patterns, with wonderful blues and greens, colors much welcomed when creating boy pages.


Various patterned papers from the collection were cut into squares, then triangles, and finally combined to form a geometric design on the left hand side of the page:


A few mustard yellow accents (stickers, star, enamel dots, a brad and banner of washi tape) bring it all together:


At the time these photos were taken, I couldn't have imagined this day would be here so soon. I'm kinda hoping he's not in such a hurry. In any case: Look out world!