Showing posts with label Pink Paislee. Show all posts

Sunday, April 5, 2020

Everywhere Else...

I missed Mardi Gras this year. Sad at first, it was probably a very good thing as much of the spread of Covid-19 in my area seems to coincide with that holiday and the influx of visitors to the city!

So here's a photo from last year, when we headed out to the avenue and stood shoulder to shoulder with thousands of our closest friends. ;)


Patterned papers and the vellum cityscape diecut are all from Vicki Boutin's Let's Wander collection.

Chipboard letters are from the gazillion half-used packages from my stash. It was a fun challenge mixing up colors and finding all those letter "e"s! I love the look:


Here's hoping next year finds Covid-19 a distant memory, and the parades can roll again.

Laissez les bon temps rouler!


Wednesday, March 25, 2020

Random Embellishments=Super Fun Page

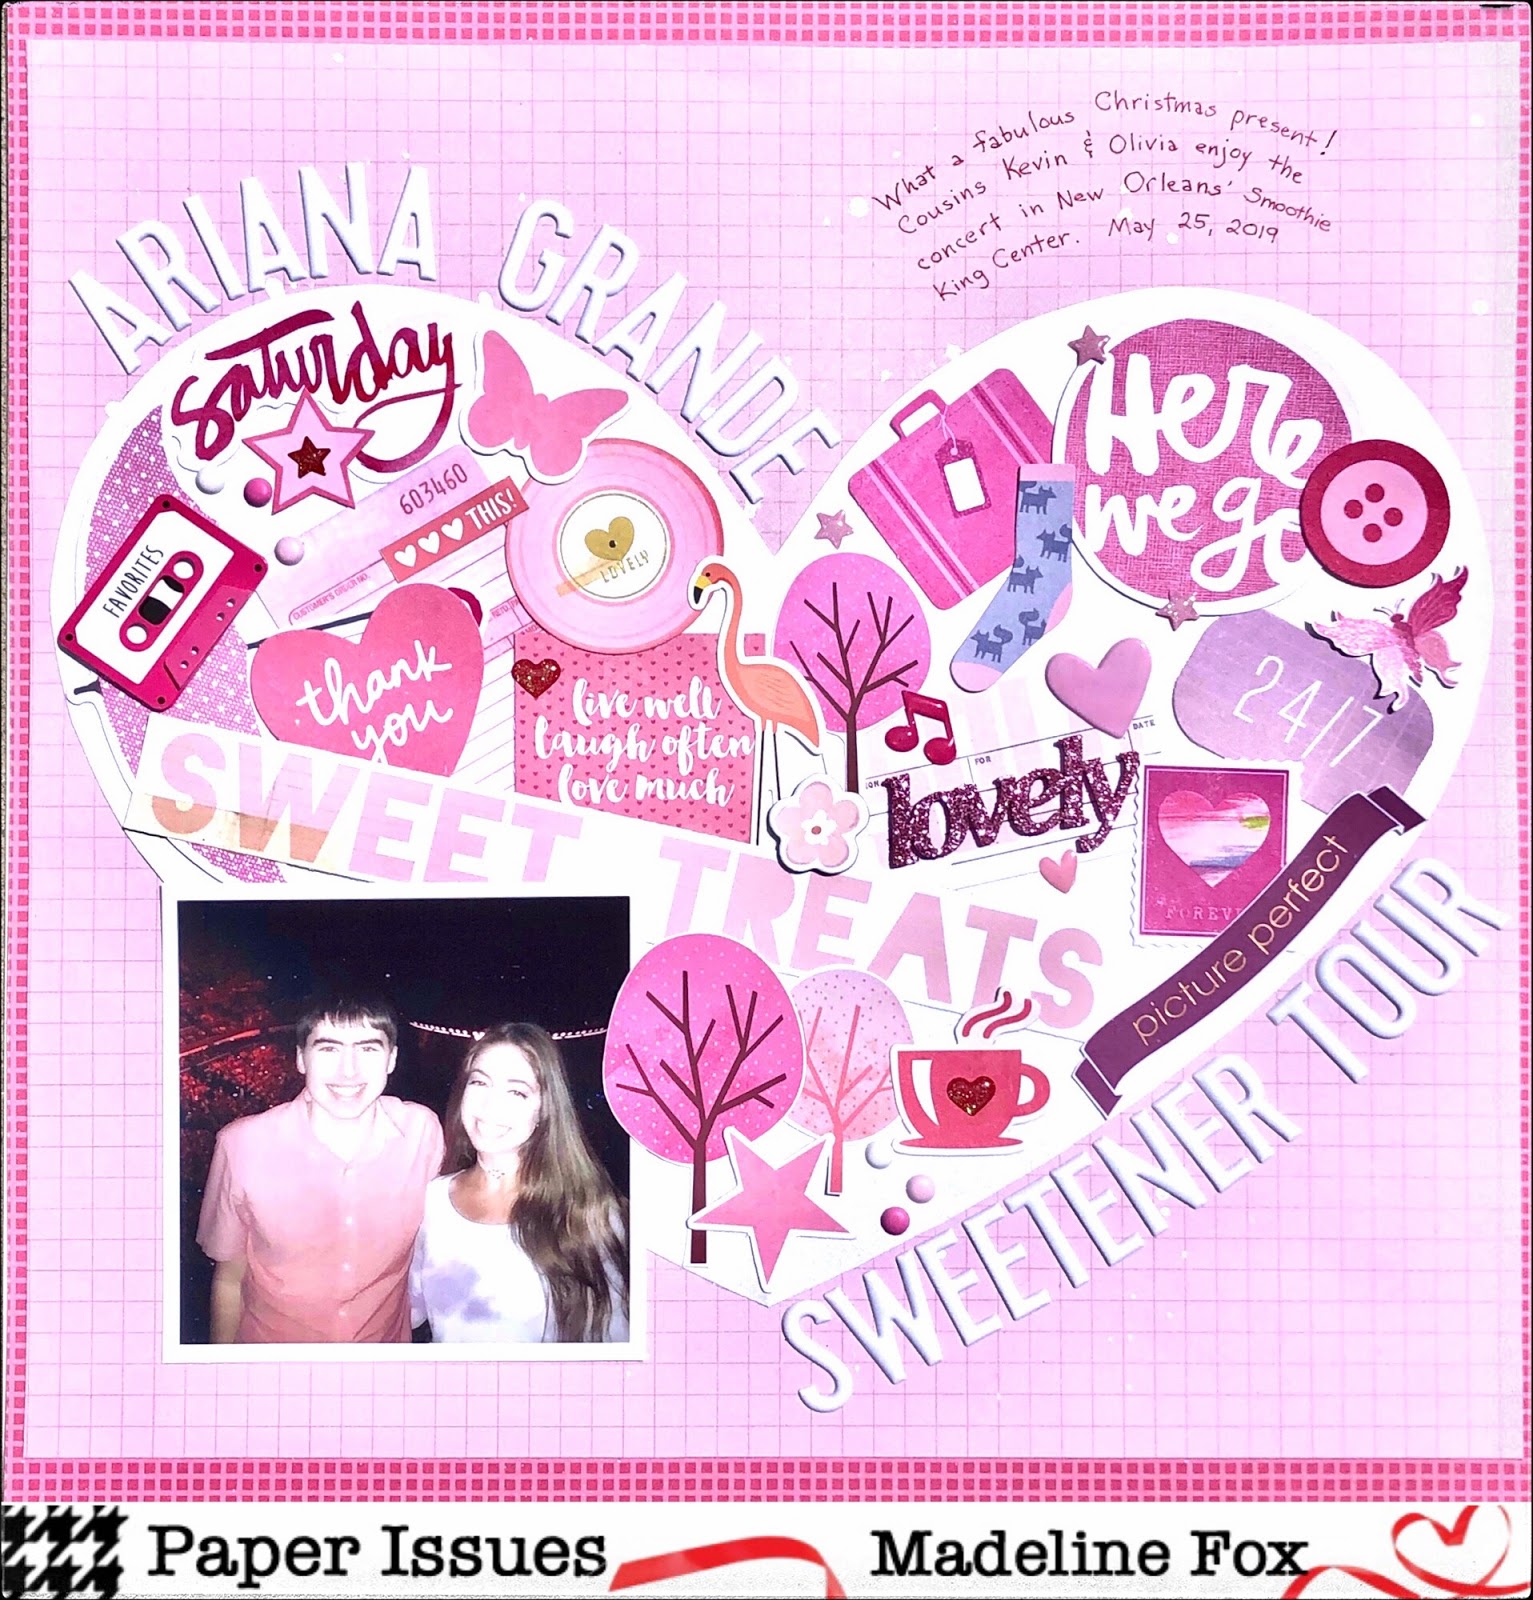
I don't get too many photos from my college kid, so when I found this one on his cousin's Instagram, I took advantage of the situation! They were at an Ariana Grande concert, tickets a Christmas present from his aunt. His pink shirt and the Paper Issues That Was Random challenge inspired the design.


Talk about random! I gathered everything pink that I could find. 

Some of the die-cuts relate pretty well: the Favorites cassette tape, vinyl record, music notes, the words Saturday, Lovely, and Sweet Treats. 

Others were truly random...but pink! A sock, flamingo, umbrella, coffee cup, button, suitcase and trees are prime examples. 


Sweet, indeed!


Friday, January 24, 2020

Noel-Snow White Challenge

[Posted to Paper Issues Blog 1/21/20]

Good morning! It's Madeline here today sharing a layout I created for this month's Snow White challenge. No snow here, and I haven't been to Disney in years, but I DO have white cardstock! ;)

First I spritzed my white background with gold mist, then I added Paper Issue's free Winter Berry Wreath cut file and topped it with die cuts from Pink Paislee's Together for Christmas collection.


 Before tucking in my matted photo, I "painted" the white wreath with Nuvo Glitter Drops


After the glitter dried, I dry brushed a little white paint over the berries to tone them down a bit.


Finally I tucked in strands of white tinsel behind the die cuts and added a smattering of gold stars. 
I wish I could show you how much this page sparkles! 

 I hope you're inspired to play along with us and post your page for a change to win a GC to the Paper Issues Store. Find this and ALL of the January Challenges in our Facebook Group.

Save 20% when you shop by using my code:

Monday, January 13, 2020

Scraplift Sunday

[Posted on the Paper Issues bog 1/12/20]

Yay for today...it's Scraplift Sunday! 

I wasn't much for scraplifting...until I began working 10 hour nights, a week on, a week off. Those "on" weeks were killer. I had no energy and little time for scrapbooking, but wanted to do something! Enter Paper Issues' Scraplift Sunday challenges. Boy were they perfect, a great jump-start for my drained brain. 

Here is my Scraplift Sunday page for today:


This amazing layout from Mary-Ann was my inspiration:


I LOVE how she incorporated all those papers and die-cuts from November's Swag Bag, grouping everything at the bottom of the page. The woodgrain background gives it white space without white! 

MY page uses papers and embellishments from Pink Paislee's Together for Christmas collection. I sorted through all the gorgeous die-cuts, and patterned papers in classic Christmas colors, then assembled a base for my photo:


Staying true to the original orientation, I placed it all on a background of gold dots on white, then started tucking in die-cuts and fussy cut flowers wherever I could. 


And there you have it. Who can argue with letting someone else do the design work, when all you have to do is pick out papers, photos, embellies, and assemble? 

If you play along, be sure to post your page on PIFF FB page for a chance in PI's monthly drawings, and on Instagram tag @PaperIssues and #ScrapliftSunday so we can oooh and aaah.
Can't wait to see what YOU create!

Use the code, MADELINE, in the Paper Issues store for 20% Off of your order.


Saturday, April 29, 2017

Quilting with Paper

(This tutorial was originally published on the My Creative Scrapbook blog.)

It takes a lot of patience to piece together and sew a fabric quilt. For me, a paper quilt is much more doable, especially when you're working with simple shapes like squares and triangles. A pattern of triangles forms the basis for the layout I'm sharing today. 


This page is created with My Creative Scrapbook's Main kit for April. The gorgeous patterned papers are from Pink Paislee's Oh My Heart collection, designed by Paige Evans. The design can certainly be duplicated in alternate color schemes, but if you want to follow along and create an identical backdrop for your page, I've included paper numbers in the instructions. Let's begin!

First, cut away the center portion of Paper No. 18, leaving a 1 inch border on all sides. Tuck this outer section away, as it will be used to finish off the layout towards the end of this tutorial.


Next, cut out (12) 2-inch squares from various patterned papers. I used Paper Nos. 18, 01, 24, 10, and 12. 

Luckily Paper No. 24 is already arranged in a 6x6 grid with each individual square measuring exactly 2"x 2". However, Paper No. 10 is arranged in a 5x5 grid, so each of those squares are larger than 2"x 2" and must be cut down slightly to use in this design. 

Then, cut each square in half diagonally, resulting in 24 triangles, the number needed for the paper quilt design.

Here is what I cut for my page:


Next, ink the edges of the triangles, and arrange on a sheet of white cardstock which has been trimmed to 10 7/8 inches by 10 7/8 inches. Begin in one corner, and work your way around, placing all 24 pieces first, before attaching with adhesive. If you're the ambitious type, you could also add some machine stitching at this point. ;)


You may have noticed that there are only three pink corners. I meant to do that, opting for a little contrast with the one purposeful purple corner on the bottom right.

Now it's time to add that border cut from Paper No. 18:


Looking good! 

Next, sort through and add various die-cuts, chipboard and your photo to the center of the design. 


The cute little fox is my favorite!


Lastly, add your journaling (always optional). I began at the top and let it flow down the center of the page. 


This simple design makes a big impact on a page! I can't wait to try this with other colors and patterns. The variety in My Creative Scrapbook's Main kit for April makes it easy to do. If you try this yourself, I'd love to see what you create, so please link me up in the comments. Thanks!


Friday, April 14, 2017

Irish Pirate?

Since I only used HALF of my favorite water-color-look paper from Pink Paislee's Oh My Heart collection for the scrapbook page that I shared on the blog yesterday, I had a "whole half" left for today's project...yay! The vibrant pink/orange/fuschia really sets off my title, and the "tear strips", those little cut-away pieces with bar code on one side, give it a fun feel.


In homage to the event captured in my photo, I gathered up several of the green die-cuts and papers to surround my "Irish Pirate". (The kids were participating in the annual Irish-Italian parade, their first experience riding on a float!)

I sure am enjoying all the colorful papers in this kit and collection! Check out My Creative Scrapbook for ALL of their gorgeous kits.


Wednesday, April 12, 2017

The World Is Your Oyster

As soon as I saw this paper, I knew that it would make a gorgeous water-colored title for my page!
BUT, instead of cutting my title out of the patterned paper, I cut it out of white cardstock. Then, I placed the yellow/pink/fuscia paper behind the splattered white cardstock and voila:


A strip of patterned paper, a couple of die-cuts and several fussy-cut flowers from the floral paper below, were all that were needed to complete the page.

This just might be my second favorite page with this kit, the April Main Kit from My Creative Scrapbook. My first fave? I have a little tutorial for that one. It's coming to the blog soon, but here's a little peek. ;)


Cute little fox, huh?! Til next time...

Friday, June 12, 2015

Your Journey Starts Here

The Scraptastic kit that I received this month is called the Can't Go Home kit and it practically screams color, big bold color! But somehow I managed to pull out a variety of soft, pastel papers and embellishments for the page below. I also had a bit of a different take on the kit's obvious travel theme. Thinking about my middle son's college graduation, I realized that although these last four years have been quite a journey, an even greater journey awaits. And it all starts here. 


The only part of the page not from the kit is the word, "here." Wanting the last part of my title to stand out, I chose a die-cut word from my stash. Then I wrapped the word end to end, using six strands of embroidery floss.


A clustering of tags and kit embellishments decorate the page: die-cuts, flair, corkboard, chipboard, and acrylic shapes:


Another tag suggests "Let's Go"!


Have you scrapped any real or metaphorical journeys lately?


Thursday, November 15, 2012

Fall Somewhere Else

Today I scrapped a photo from 25+ years ago, back in the 80s, when my oldest daughter was a toddler. We had not been on a vacation since becoming parents, and here we were road tripping it to Pennsylvania to visit Tommy's aunt in Philly. Maw Maw and Paw Paw were traveling with us. I guess we took two cars, as we didn't have a van at the time. Gas must have been relatively cheap! One day during our visit, we headed out for some sightseeing in the surrounding countryside. Somewhere along the way, we spotted this bridge, a covered bridge, right out of a Currier & Ives scene! Today I googled "covered bridge Pennsylvania" and discovered that this was the Knox Bridge in Valley Forge.


Fabric letters from American Crafts, and tiny letter stickers from Lily Bee Designs make up the title:


A few shiny mini-pearls from Doodlebug Designs enhance a sticker from Simple Stories :


And my favorite part, a patchwork heart wound with twine:


(This page was scrapped entirely with Scraptastic's Farmer's Market main kit and add-on.)

Monday, November 12, 2012

What We Call Fall

With the season-inspired Farmers Market kit from Scraptastic, I was determined to create a fall page, even though our fall photos show a season very different than that experienced by those of you to the north of us. This photo of my son in front of his school on an early fall day shows exactly what our fall is like around here...green grass and leafy trees. Thus my title was born:


Stacking the bingo cards provided a resting place for a few small embellishments.


TIP: The pop dots that give the green leaf a bit of added dimension serve double duty. The heart and flower pins are stuck into the foam dots, keeping them secure and protecting both pages and fingers from errant pokes and holes.


Flowers, little birds and a green tree are layered on and around the large letters of my title. They look particularly nice popped up with foam.

Funny thing, but in creating this page, I must have jinxed myself. We woke up to some frigid temps this past week. Not freezing mind you, but with lows in the 40s, high humidity and whipping winds, it was darn cold for us tender southern gals! I think I'm ready to hibernate until spring!


Sunday, July 29, 2012

Plaza de los Amigos

Epcot has always been one of my favorite WDW destinations. After a morning of thought-provoking and thrilling adventures in Futureworld, it's nice to slow down and enjoy the scenic beauty of the World Showcase countries. Heading clockwise around the lagoon (which we always seem to do), first up is Mexico. At around midday it's a nice respite from the heat to head indoors, where a festive marketplace is recreated inside the pavilion's temple structure. The Gran Fiesta Tour is not the most thrilling, but the pleasant little boat ride gives everyone an opportunity to get off their feet and float through an entertaining attraction.

The page design is simple and embellishments are handmade. Small scraps from Scraptastic's Nostalgic Summer July kit were arranged on a neutral background, squares at the top, a variety of rectangles on the bottom. This is a great design for using up leftovers, and even smaller pieces of patterned paper were cut in various flag shapes for the banner.


A hand-pieced sombrero adds a little touch of Mexico and is used to hold the title.


Yep...I'm still working on Disney pages from last year's vacation. It's fun to take out my photos and experience everything again. The memories will have to last until our next trip to see the mouse...and who knows when that might be!

Sunday, July 15, 2012

A Life of Simplicity


Back when my girls were young, and the three boys hadn't even entered into our family's equation, we took a trip to Pennsylvania. We had driven all the way to Philadelphia with my husband's parents and our two girls to visit Aunt Rita and cousin Rosie. We toured the city of brotherly love, checking out the steps of the Art Museum and giving it our best "Rocky" pose. We saw the cracked Liberty Bell and Betsy Ross's house. And we ate Philly Cheese steaks from Pat's. One day we left the city proper and drove out to the Amish country to see a life that was quite different from ours. And this was before cell phones and the internet. Yep...once upon a time there was no internet! Al Gore had yet to invent it. Hahaha!

It was an intriguing lifestyle. No cars, no electricity, no telephones or modern conveniences. Horses pulled the plow. Clothes were old fashioned and fastened with pins. I guess you don't miss what you've never had. It was a life of simplicity. On this page are two photos from that day in the country, scrapped with Scraptastic's Nostalgic Summer kit:


I used some of the more muted colors (b-sides) of the kit papers for this page, and kept with a few simple embellishments as well, tucking a piece of burlap underneath my cluster of journaling blocks and tags. After adding a couple of paper flowers, I then tried my hand at a homemade twine flower.


This Twine Flower Tutorial  is the best I've found. She shows you step by step how to create your flower, even changing colors midway to more easily illustrate the method used to recreate these rustic beauties. The flower on this page is my first attempt. My only variation was to only go around the loom once so my petals are not doubled. I think it came out fairly well all things considered! Next I hope to create a few flowers in various colors, using twine from my stash. If you try it yourself, please share your creations with me. I'd love to see what you make!

Monday, July 9, 2012

The Sky's The Limit

My first page with Scraptastic's Nostalgic Summer kit showcases a photo of my son and his friend playing at dusk at a park in Mississippi. Their Cub Scout pack was camping nearby, and the "beach" area near the lake held an old fashioned teeter-totter. You don't find those things very often anymore, most likely because of the lawsuits that crop up after one kid jumps off and the other goes crashing to the ground! This was quite an interesting diversion for the two boys as I don't think either had ever been on one. They continued their fun as day faded into night.


A sticker sheet in the kit gave me both my title and the idea to create the kite embellishments. Tying each of those little bows onto the thicker jute string took a bit of dexterity but I love the finished look it gives to my kites. Not wanting those bows to come untied, I dabbed a bit of liquid adhesive onto their centers to keep them secure.


Some inking, a bit of pen stitching, and pop-dots when layering stickers, kites, and title letters added a little more interest to my design. In order to use both sides of that awesome patterned chevron paper, I cut out the middle portion of my page, flipped the cut-out to the opposite side and mounted it onto a slightly larger piece of kraft paper which I then positioned over the "hole" in my page. And there you have it...my frugal tip of the week!

Next week I will share another page created with this kit and a link to a jute flower tutorial that I used in creating an embellishment for that layout. I hope you'll join me.